Reference Points on a Curved Surface
A Cut Is a Shape Drawn on a Sphere
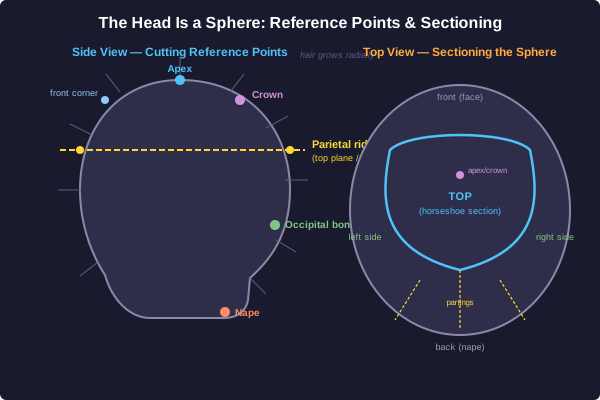
A haircut is not a flat drawing. The canvas curves away in every direction. Treat the head as an approximate sphere and the hair as fibers growing radially outward from it, and the whole craft becomes geometry: where you part, how far you lift, what line you cut, and how the curve of the head turns that line into a silhouette.
Reference points stylists name on the sphere:
- Apex: the highest point of the head, the top of the sphere.
- Parietal ridge: the widest circumference, where the head starts to curve back in. Run a comb flat against the head until it lifts off: that is the ridge. It is the single most important horizon line in cutting.
- Occipital bone: the bump at the back of the skull, below the crown.
- Crown: the swirl region just behind the apex, where hair grows in a circular pattern.
- Nape: the hairline at the back of the neck, the bottom of the cutting area.
- Four corners: front hairline corners and back corners at the parietal ridge; connect them and you have mapped the top plane versus the sides and back.
Sectioning divides the sphere into workable patches. A common map: a horseshoe parting from the front corners around to the crown isolates the top; vertical or diagonal partings divide the sides and back. Each section is small enough that, held in the fingers, it behaves like a nearly flat plane even though it came off a curve.
Why the Curve Changes Everything
A student stylist parts off a vertical section at the back of the head, combs it straight out from the scalp, and cuts a line perfectly parallel to the floor. When the hair falls, it is noticeably shorter near the nape and longer toward the crown: even though the cut line was a single straight line.
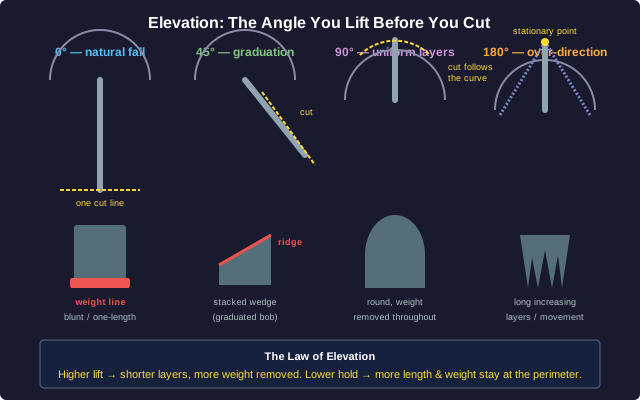
0°, 45°, 90°, 180°
Elevation Decides Where Weight Lives
Elevation (also called projection) is the angle you lift a section away from the curve of the head before you cut it. It is measured from the head's surface, and it is the single biggest lever in shaping a cut.
- 0° elevation (no lift): the section hangs at natural fall, flat against the head. Cut a straight line and every strand falls to the same perimeter line. This builds a weight line: maximum density at the bottom. One-length bobs, blunt cuts, solid lines all live here.
- 45° elevation: the section is lifted halfway between the head and straight-out. Cut a straight line and the strands stack on each other: the result is graduation: a wedge of built-up weight that sits on a visible ridge line somewhere on the head, not at the very bottom. Classic graduated bob, stacked nape.
- 90° elevation: the section is pulled straight out, perpendicular to the curve of the head. Cut a line that follows the curve of the head and you get uniform layers: every strand the same length measured from the scalp, which: because the scalp is a sphere: produces a rounded silhouette with weight removed throughout.
- 180° elevation / over-direction: sections are pulled up past 90°, often all to one stationary point. This creates long, increasing layers: lots of length variation, lots of movement, very little weight anywhere.
The law of elevation: the higher you lift before you cut, the shorter the layers and the more weight you remove; the lower you hold it, the more length and weight stay at the perimeter. Everything between a blunt bob and a fully shaggy layer is a choice of angle.
Projection vs. distribution: elevation is how high you lift; distribution (over-direction) is which direction you comb the section before lifting. Comb a section toward a fixed point away from its natural fall and the far strands get longer: that is how you build length increase on purpose, the way the head's curve did it by accident in Section 1.
Choosing the Angle for the Shape
A client wants a chin-length cut that is heavy and solid along the bottom edge: a strong blunt line, no stacking, no visible layers: but with the interior softened just slightly so it is not a helmet.
Wedges, Ridges, and Stationary Guides
Graduation Is a Wedge of Stacked Weight
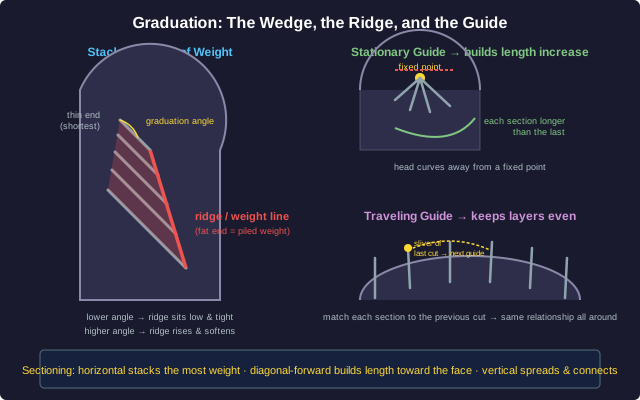
Graduation is what happens between 0° and 90°: each strand is slightly longer than the one beneath it, so the lengths stack into a wedge. The wedge has a fat end (where weight piles up: the ridge line or weight line) and a thin end (where the shortest lengths sit). Move the ridge and you move the entire character of the cut.
The graduation angle is the angle of the stacked line relative to the head. A low graduation angle (close to 0°) stacks the weight low and tight: think a sharp, heavy A-line bob, or a tightly stacked nape on a wedge cut. A higher graduation angle (toward 45°) lifts the ridge up the head and spreads the wedge out: softer, more rounded graduation.
Stationary guide vs. traveling guide: this is the geometry that controls where the ridge ends up:
- A stationary guide stays in one place. Every new section is over-directed back to that fixed guide and cut to it. Because the head curves away from a fixed point, each section comes off the head a little longer than the last: so a stationary guide builds length increase automatically. Used to stack weight (the back of an A-line, the corner of a graduated bob) and to keep a perimeter heavy.
- A traveling guide (mobile guideline) moves with you: you cut a section, then use a small piece of the just-cut hair as the guide for the next section, walking the guide around the head. A traveling guide repeats the same length relationship section to section, which is how you keep layers even all the way around.
Sectioning orientation matters too. Horizontal partings with low elevation stack the most weight (heaviest graduation). Diagonal-forward partings (angled toward the face) build length increase toward the front: face-framing. Diagonal-back partings do the opposite. Vertical partings with elevation spread weight out and connect the cut top to bottom.
Designing a Stacked Bob
A client wants a stacked A-line bob: short and tucked-in at the nape, with a clean visible stack of weight just below the occipital bone, then swinging longer toward the front, ending well past the chin at the face.
Uniform Layers, Increasing Layers, and the Cross-Check
Layers Are What 90° and Above Build
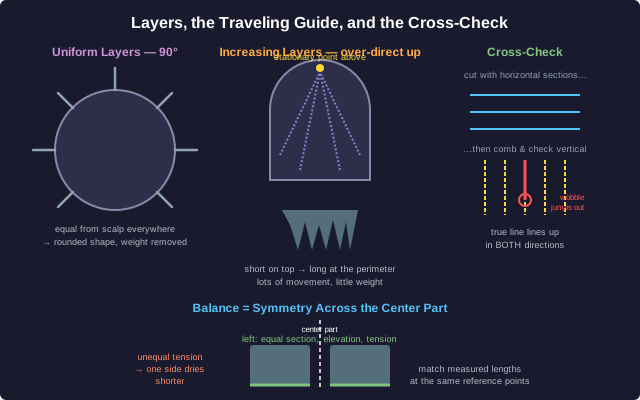
- Uniform layers: every section pulled straight out from the head at 90° elevation and cut to the same length from the scalp. On a sphere, equal-from-scalp everywhere produces a round silhouette with weight removed throughout. This is the classic 'layered all over' cut.
- Increasing layers: sections cut longer as you move down or back, usually built by over-directing to a stationary point above (toward 180°). Short on top, progressively longer toward the perimeter: lots of movement, a long shaggy shape, very little weight anywhere.
- Decreasing layers: the reverse: longer on top, shorter toward the perimeter. Used carefully; over-done it leaves a hole of weight.
The traveling guide makes layers even. You cut the first section, keep a sliver of it visible, and use that sliver as the guideline for the next section: walking the guide around the head. Because you are always matching to the previous cut length, not to a fixed point, every section repeats the same length relationship and the layers stay consistent over the whole sphere. Lose the guide: cut a section with nothing from the last section showing: and you have no reference; the next section is a guess, and a guess shows up as a step or a hole.
Connecting sections. A finished cut has to be continuous: the top has to blend into the sides, the sides into the back. You connect by over-directing the boundary sections so a piece of one zone is cut against a piece of the next. A disconnected cut has a visible shelf where two zones meet at different lengths.
Cross-Checking: Proving the Geometry Holds
If you cut with horizontal sections, you cross-check with vertical ones: and vice versa. Comb the finished hair in the opposite direction to how you cut it and look at the ends: if the line is true, the lengths line up cleanly in both directions. A wobble that was invisible along the cutting direction jumps out when you look across it. Cross-checking is the stylist's way of verifying that the shape on the sphere is the shape they intended: the haircut equivalent of measuring a part two different ways.
Balance: Left Must Mirror Right
The two sides of the head are mirror images across the center part, so the cut must be too. Equal sections measured from center, equal elevation on matching sections, equal tension as you cut (hair stretches when wet; pull harder on one side and that side dries shorter and springs up uneven), and equal finger position. Balance is symmetry, and symmetry is checked by comparing measured lengths on the left and right at the same reference points.
Diagnosing a Cut That Went Wrong
A new stylist finishes an all-over layered cut and steps back. Three problems are visible:
1. The left side is about a centimeter shorter than the right at the same point below the ear.
2. There is a distinct shelf at the back where the top section sits clearly longer than the section below it: they do not blend.
3. Looking at the crown, there is a short patch the rest of the layers do not match: it looks scooped out.
Haircutting Geometry: Summary
What You Have Learned
A haircut is a shape constructed on a sphere, and every choice in it is geometric:
- The head is a sphere. Hair grows radially, so the roots of any section sit on an arc: one straight cut line maps to different lengths along that arc. The parietal ridge is the horizon between the top plane and the sides and back.
- Elevation decides where weight lives. 0° (natural fall) builds a weight line and a blunt edge. 45° stacks weight into a graduation wedge on a ridge. 90° (straight out) builds uniform layers and a round, weightless shape. 180° / over-direction builds long increasing layers. Higher lift = shorter layers and more weight removed.
- Guides place the ridge. A stationary guide: over-directing every section to a fixed point: makes each section come off longer than the last (the head curves away from a fixed point), so it stacks weight and builds length increase. A traveling guide matches each section to the previous cut, keeping layers even all the way around.
- Sectioning steers the build. Horizontal partings stack the most weight. Diagonal-forward partings build length toward the face. Vertical partings spread weight and connect the cut top to bottom.
- Cross-checking proves it. Cut horizontal, check vertical; cut vertical, check horizontal: and compare left to right at the same reference points. If the lengths line up in both directions, the geometry held.
- Balance is symmetry. Equal sections, equal elevation, equal tension, equal finger position, left and right. Unequal inputs make unequal lengths, and the client sees it the moment they stand up.
Vidal Sassoon built a career on this: stop styling the hair into a shape and cut the shape into the hair, with angles you can name and a result you can predict. That is geometry: and it is why a stylist who works the angles delivers the same cut twice, and one who eyeballs it delivers a surprise.